How to Write a README in Markdown
To write a README in Markdown, create a file named README.md in the root of your project and give it, in this order: a one-line description of what the thing is, how to install it, how to use it, and where to go next. That is the whole shape. Everything else (badges, a table of options, a collapsible FAQ, a license line) is optional, and most good READMEs are shorter than people expect. This post walks through each section with the exact Markdown, then shows the one file rendered.
Why the file is called README.md
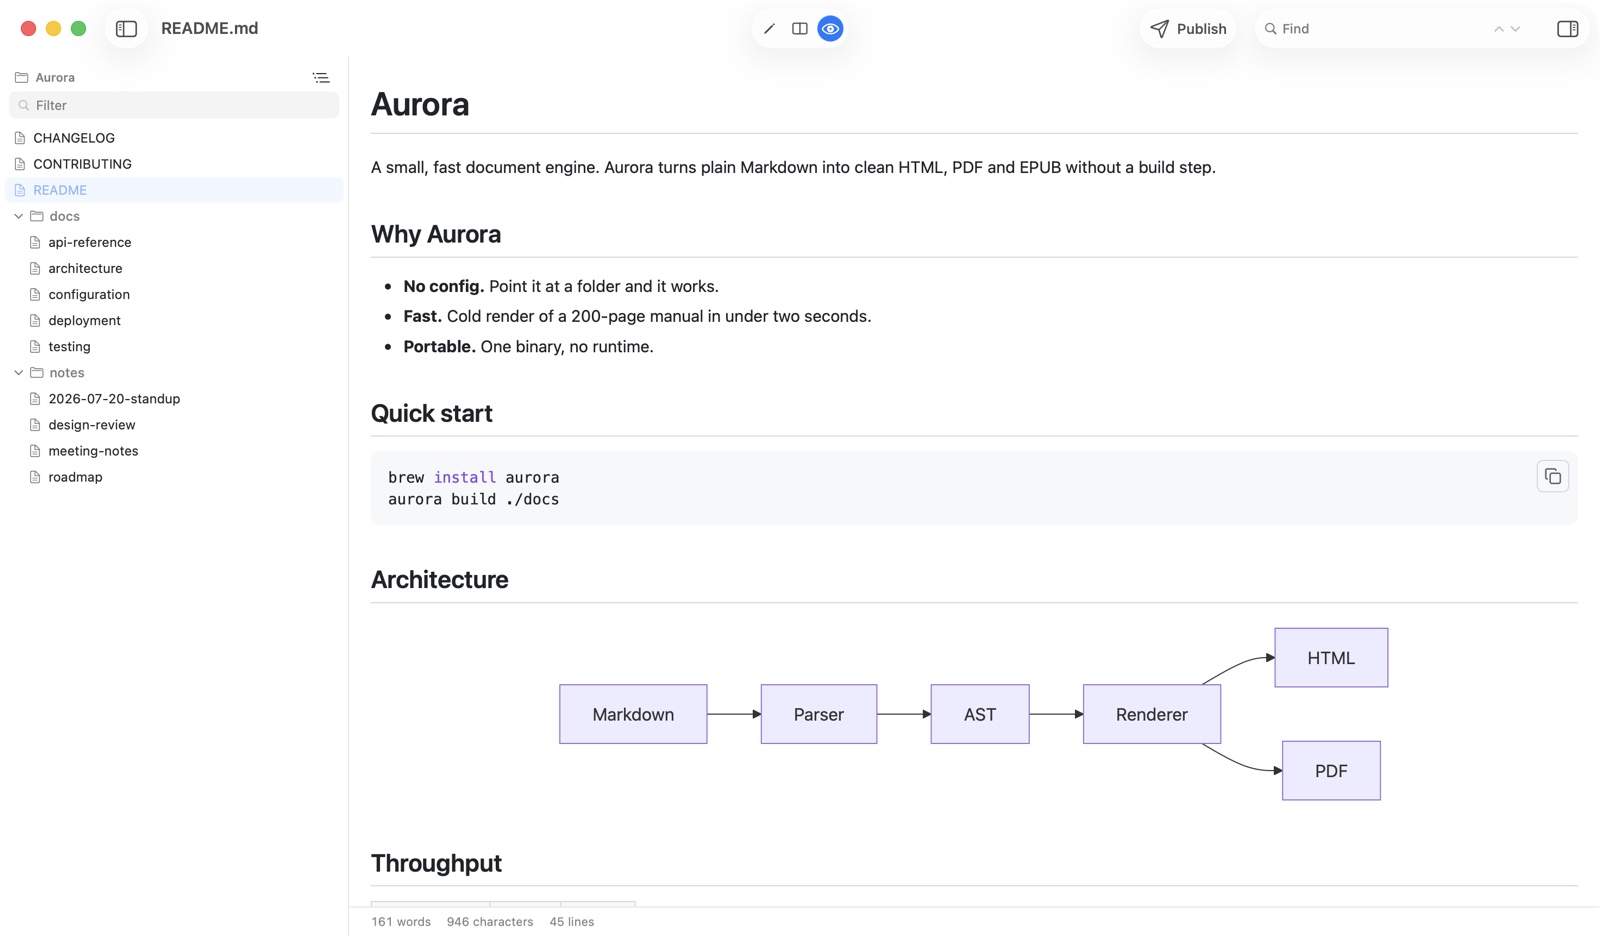
The name is a convention, not a rule, but almost every tool honors it. GitHub, GitLab and Bitbucket render the root README.md under the file list of a repository. Package registries such as npm and PyPI use it as the package page. And on your own disk, a Markdown app with a folder view will pick it as the first thing to show: when you open a folder in QuickMark on the Mac (File ▸ Open Folder…, or drop the folder on the app), it looks for a root-level file named README, index or Home, in that order and ignoring case, and opens that one first. No README, and you get the first file in the folder instead.
So the name buys you a free landing page in four places. Use it.
The sections, in order
1. Title and one-line description
The title is a level-one heading. The line under it answers "what is this?" in one sentence. Write it for someone who has never heard of the project.
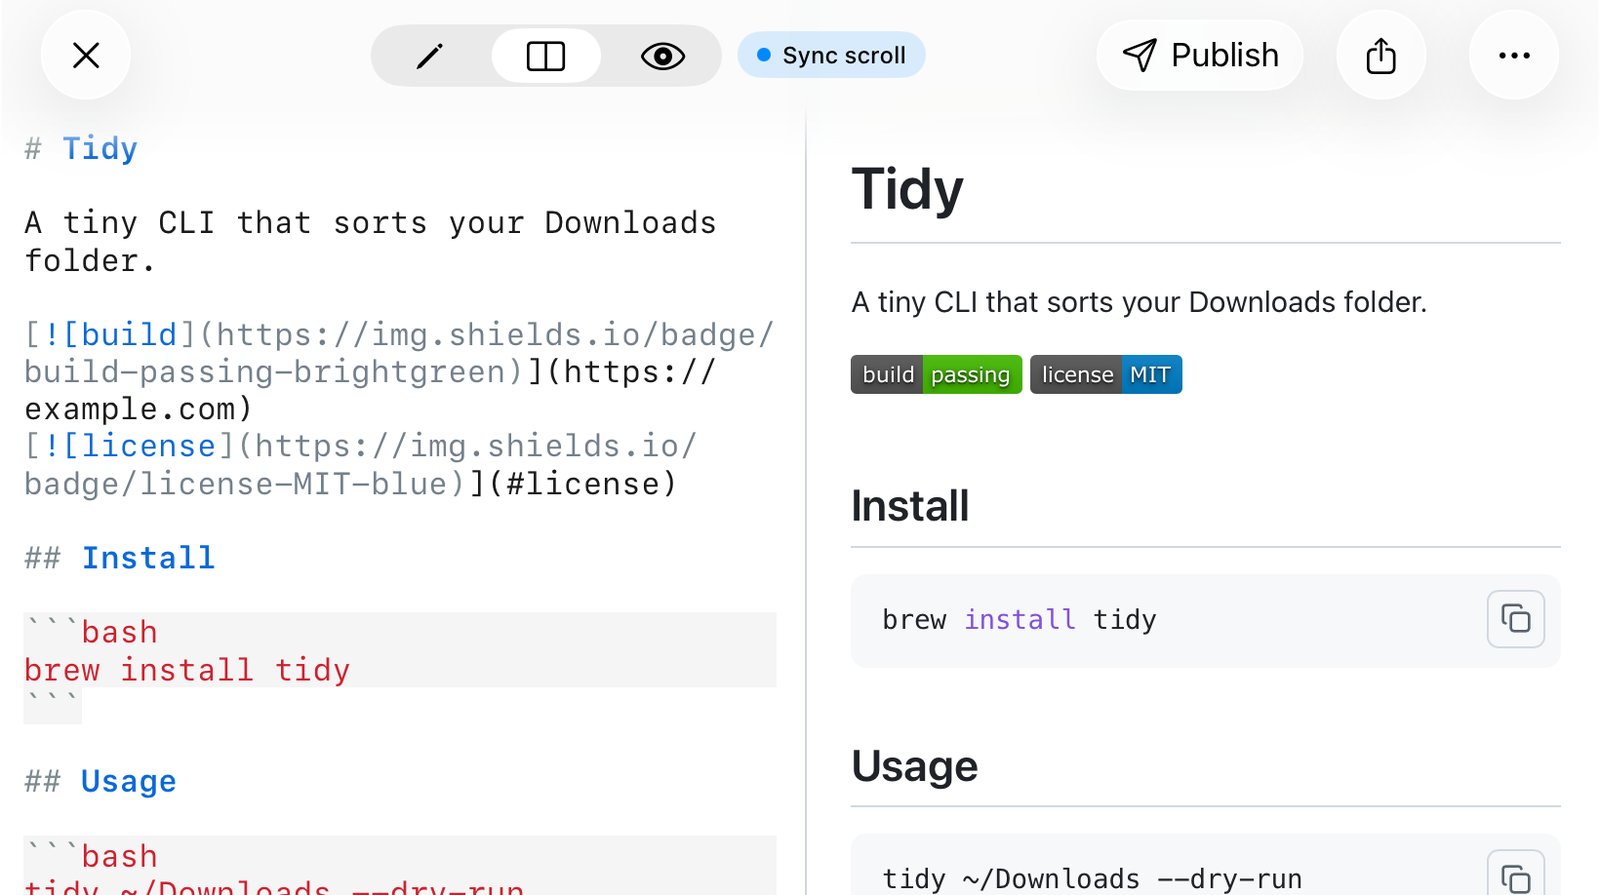
# Tidy

A tiny CLI that sorts your Downloads folder.Tidy
A tiny CLI that sorts your Downloads folder.
Resist the urge to open with history or motivation. "Tidy started in 2024 when I noticed…" can live further down, under a heading like Why. The first screen should say what it is and how to get it.
2. Badges (optional)
A badge is an image inside a link. The image comes from a service such as shields.io, and the link goes to the build, the license or the package page:
[](https://example.com)
[](#license)

Read it from the inside out:  is an image, and wrapping it in […](url) makes it a link. Two or three badges are plenty. A row of twelve says more about the author than the project. Because badges are remote images, they need a network connection to show up; an offline preview shows the alt text instead.
3. Install
One fenced code block per way to install. Put the language after the opening backticks so the command gets highlighted, and keep every command copy-pasteable on its own line:
## Install

```bash
brew install tidy
```Install
brew install tidyDon't put a $ prompt in front of commands. It looks authentic, and then everyone who copies the line gets a "command not found: $" error. If the project installs in more than one way (Homebrew, pip, a download), give each its own short block with a bold label above it rather than one long block with comments.
4. Usage
Show the single most common invocation first, then a table of options. A table beats a bullet list here because flags and their meanings line up:
## Usage

```bash
tidy ~/Downloads --dry-run
```

| Flag | What it does |
| --- | --- |
| `--dry-run` | Show moves, change nothing |
| `--by` | `type` or `date` |Usage
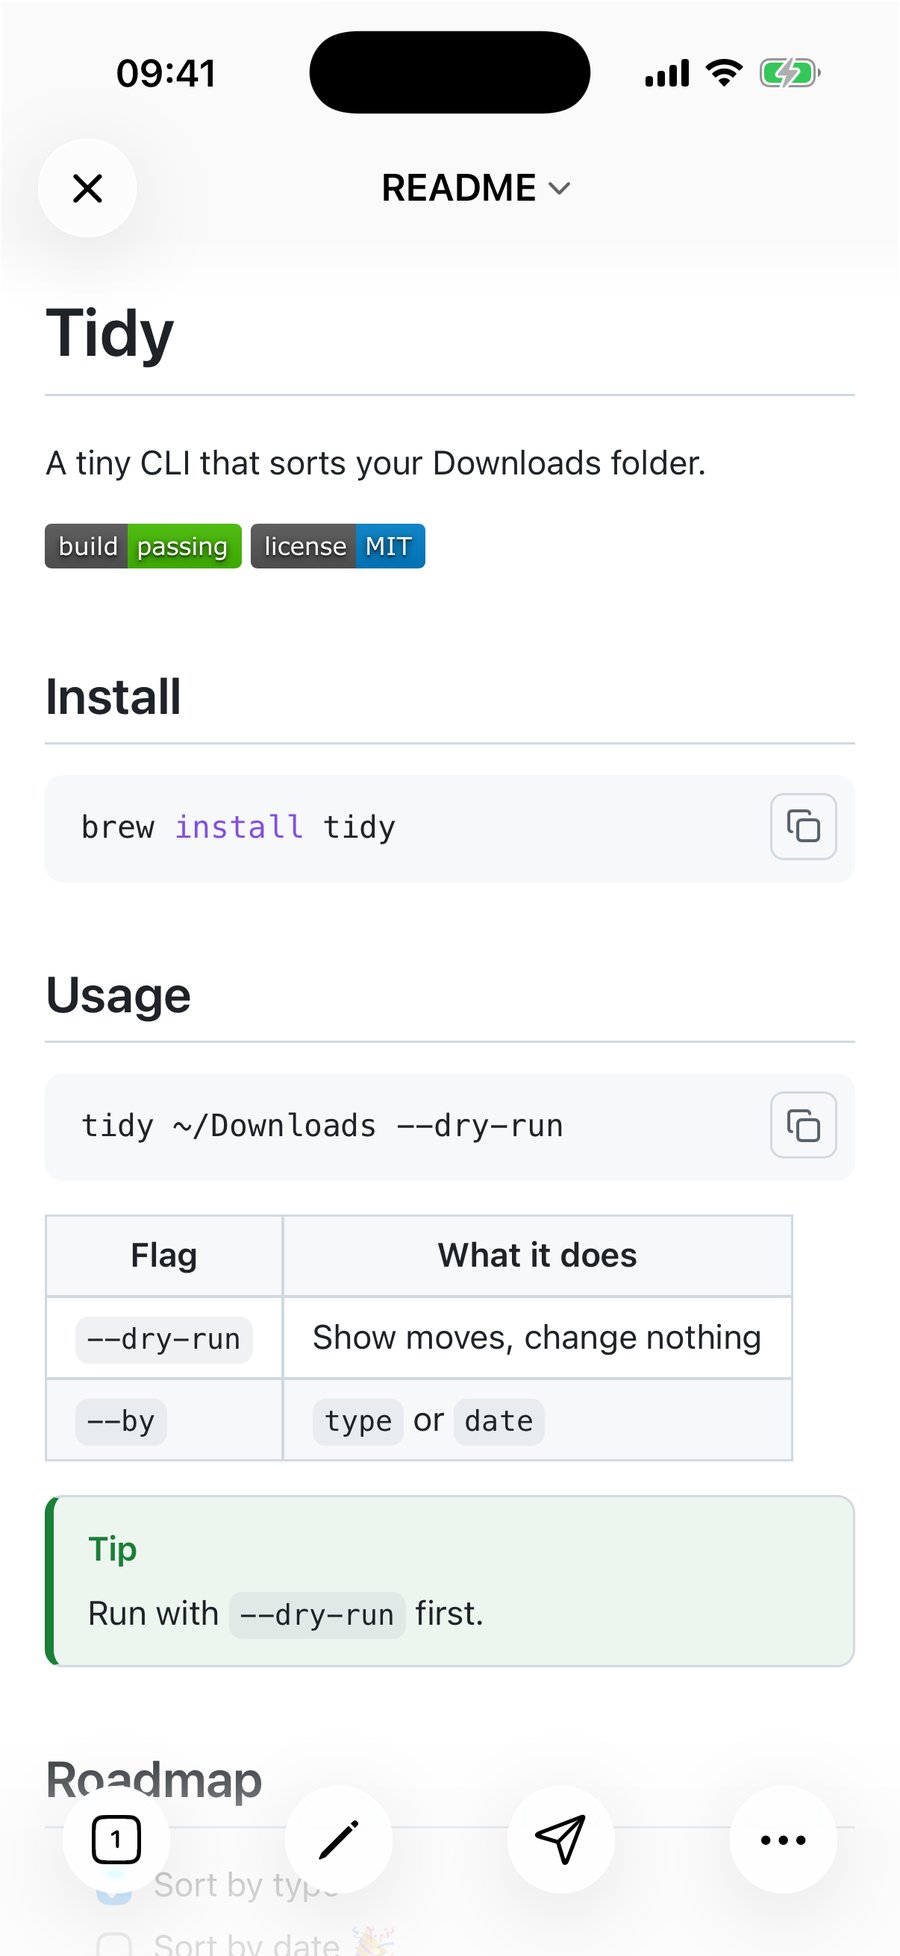
tidy ~/Downloads --dry-run| Flag | What it does |
|---|---|
--dry-run | Show moves, change nothing |
--by | type or date |
Backticks inside table cells are fine. Pipes inside cells are not, unless you escape them as \|. If your table needs more than three or four columns, it's probably two tables. The table post covers alignment and the edge cases.
5. A warning the reader shouldn't miss
GitHub's alert syntax, a blockquote whose first line is [!TIP], [!NOTE], [!WARNING] and so on, is the right tool for the one thing that will bite a new user:
> [!TIP]
> Run with `--dry-run` first.TipRun with
--dry-runfirst.
GitHub renders five kinds (NOTE, TIP, IMPORTANT, WARNING, CAUTION). QuickMark renders those five plus a few Obsidian-style ones such as INFO and DANGER. Anywhere the syntax isn't understood, it degrades to an ordinary quote, so nothing is lost. More in blockquotes and callouts.
6. Roadmap or status as a checklist
A task list tells a visitor what works today without a paragraph of hedging:
## Roadmap

- [x] Sort by type
- [ ] Sort by date :tada:Roadmap
- ☑ Sort by type
- ☐ Sort by date 🎉
The :tada: is an emoji shortcode. GitHub and QuickMark both turn it into the emoji; a plain CommonMark renderer leaves it as text, which is harmless. Pasting the actual emoji character works everywhere.
7. A collapsible section for the long tail
Markdown has no syntax for "click to expand", so READMEs borrow two HTML tags. Leave a blank line after <summary>, or the Markdown inside won't be parsed:
<details>
<summary>Why not a GUI?</summary>

Because a cron job can't click.

</details>Why not a GUI?
Because a cron job can’t click.
This is the one place where the HTML question matters. GitHub allows <details>, <summary>, <img>, <p align="center"> and a few others, and strips the rest. QuickMark does the same kind of allowlist (the tags above render; scripts, styles and iframes never do), so a README that looks right on GitHub looks right in the app. A centered logo with a width, the classic <p align="center"><img src="logo.png" width="120"></p>, works in both.
8. License and links to more
End with the license in one line and links to anything longer. Links to headings in the same file use the heading's text, lowercased, with spaces as hyphens and punctuation dropped: ## Getting started becomes #getting-started. That's the GitHub rule, and QuickMark builds its heading ids the same way, so a table of contents at the top of the README works in both.
## License

MIT. See [docs/setup.md](docs/setup.md).A relative link like docs/setup.md is the right way to point at other files in the repository. GitHub resolves it on the site. On the Mac, QuickMark opens it in a new tab. On iPhone and iPad it does nothing yet (the preview quietly ignores relative file links there), so if you write READMEs on the phone, expect to open the second file by hand.
The whole file
Put together, the README from this post is 42 lines. Here it is on an iPhone, which is a decent test: if the structure survives a narrow screen, it survives anything.
Previewing a README while you write it
Because a README is the first thing people see, it's worth reading it rendered before you push, and not just on GitHub after the fact. Three ways to do that with QuickMark:
- Mac, from the project folder. Open the folder (File ▸ Open Folder…, ⇧⌘O, or drop it on the app). The README opens first, and the Folder Files sidebar lists every other Markdown file in the tree, so
CONTRIBUTING.mdanddocs/are one click away. - Mac, from Finder. Select
README.mdand press Space. Quick Look shows it rendered without opening anything. Remote badges load; local images next to the file don't in Quick Look, because the preview sandbox covers only the file itself. - iPhone and iPad. Open the file from Files or from a cloud provider, then switch between editor and preview (iPad shows both side by side). Local images render once you grant folder access the first time.
Things that trip people up
- A single line break isn't a paragraph. Two lines that touch are joined into one. Leave a blank line between paragraphs, and between a heading and the text under it.
- Headings need the space.
#Installis literal text.# Installis a heading. - A code block inside a list item must be indented to line up with the item's text. An unindented fence ends the list, and the block renders on its own below it.
- Image paths are relative to the README, not to wherever the reader is.
docs/img/logo.pngworks ifdocs/sits next to the README. - Don't write the table of contents by hand for a README under 200 lines. Headings are the table of contents.
If you want a cheat sheet for the rest of the syntax, this one page has it, and the GFM post lists exactly which GitHub extensions render the same elsewhere.
Get rendered Markdown previews everywhere
QuickMark is a free, native Markdown app for Mac, iPhone and iPad. Live preview, export and publish built in.